

by Torsten Kruse, founder and president
Kruse Analysis and Kruse Training
The moldmaking business is evolving and, as molded parts get thinner and more complex, achieving high-quality results becomes more challenging. Mold designers and moldmakers now are becoming all-around program managers – not just expected to understand moldmaking, but also to evaluate the interactions between part design, polymer material and the molding process. In this capacity, mold designers and moldmakers can urge part designers to optimize designs based on the polymer materials and interact with the molder for input on process development and potential molding challenges.
Consistently molding higher-quality parts requires collaboration from all team members – from the polymer material manufacturer to the part designer, from the mold designer to the moldmaker and to the process team. When everyone is working together, the goal can be achieved.
A few important things should be considered by moldmakers and designers for every new project:
- Polymer material: Understanding polymer molding behavior is the crucial first step in optimizing part design. Mold designers and makers should be involved in the part design optimization team with polymer as the focus.
- Part and mold design: Designing a mold that will satisfy customers’ requirements requires an optimized part design.
- Process: Because some mold designs can cause significant molding processing challenges, understanding this step is crucial for a successful outcome.
Injection molding is a process of heat exchange, and thermal properties of polymer materials play a key role in this process. This article focuses on polymer materials and how a basic understanding of thermal mechanical properties can provide moldmakers the ability to evaluate and predict the heating and cooling behaviors of molded parts.
During the injection molding process, a polymer is heated in different ways, beginning inside the machine cylinder. Electric heater bands around the cylinder create heat, which is transferred through conduction from the cylinder to the polymer. Then, the rotating screw creates shear heat, which transfers to the polymer on top of the conduction transfer.
In addition, when the material is rapidly injected through the machine nozzle body, nozzle tip, runner system and gate, more shear heat is generated. As the shear heat energy increases, the temperature of the polymer continues to increase, driving up the temperature of the material inside the cavity.

The two primary material properties that affect part and mold design are specific heat capacity and thermal conductivity. Heat energy within a polymer is removed by heat convection as coolants run in the cooling channels of the mold. This process lasts until the mold is opened and the product is ejected. The polymer continues to cool to room temperature by dissipating its energy into the air.
To understand how a mold acts as heat exchanger, think about a temperature cycle variation with a steady coolant temperature and fl ow. During the filling, packing and cooling stage, the heat of the plastic is transferred to the mold cavity. Once it reaches the high temperature point, the part begins to cool and the mold wall temperature decreases to its lowest point, generally coinciding with when the mold is opened. When the mold is closed again, the same temperature waves repeat throughout the process.
The natural heat exchange, represented by these waves, occurs with any material, mold or process. The maximum and minimum temperatures depend on the melt and mold temperature, as well as the process set-up.
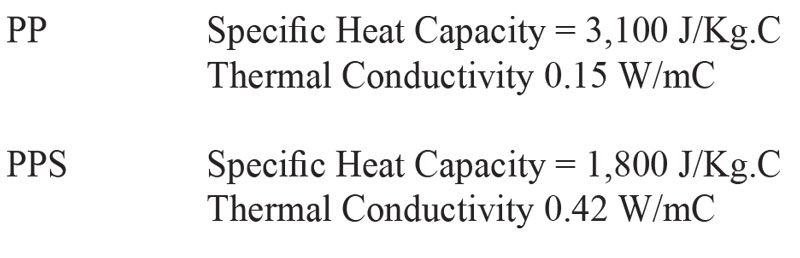
Specific heat capacity is how much heating energy is required to bring a polymer to its process temperature range. Thermal conductivity is a property that indicates how quickly heat will move through the polymer material during the heating and cooling phase.
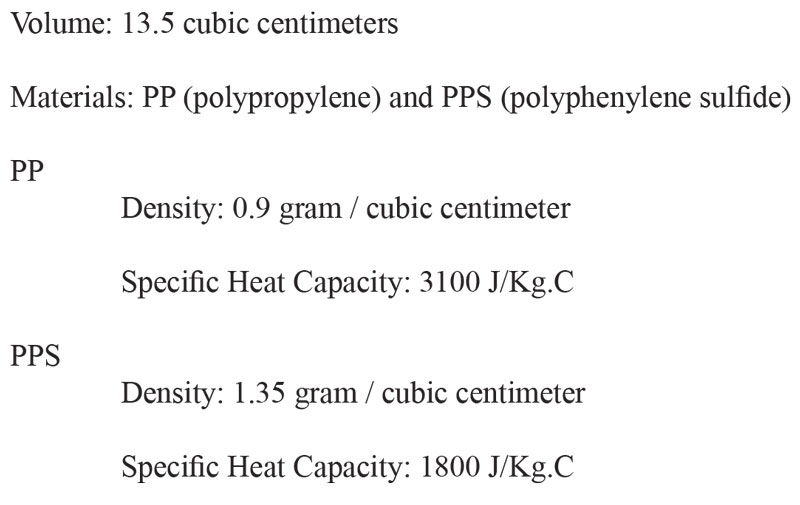
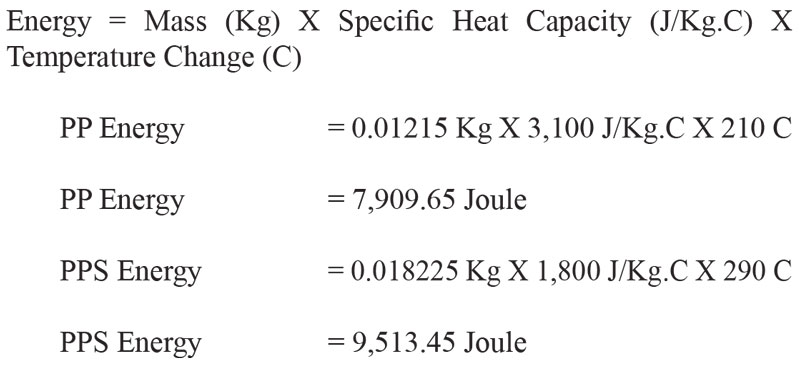
The concept of specific heat capacity can be illustrated through a simple heat energy calculation for a molded part. The specifics for the sample part are shown.
The results from these calculations indicate the energy required for the materials to be heated to their midrange process temperatures and the amount that must be withdrawn. Notice that the PP material needs about 17% less energy to be brought up to the process temperature.
The rate at which energy is removed depends on various factors, including the thermal conductivity of a polymer, the heat transfers effectiveness between the polymer and the mold, and the thermal conductivity of the mold steel. Plastics, which are considered insulators, have low thermal conductivity compared to that of metals.
In this example, PPS material carries higher heat energy into the mold than PP material. The heat energy numbers indicate that more heat needs to be removed from the PPS molded part than from the PP molded part.
The question is, does a higher heat load inside the mold require a longer time period to remove the heat? The answer depends. It does take longer – but only if the material has the same thermal conductivity. So, in this example, the thermal conductivity of the PPS material is almost three times higher than that of the PP material; therefore, the heat energy from the PPS molded part can be removed much faster than from the PP molded part.
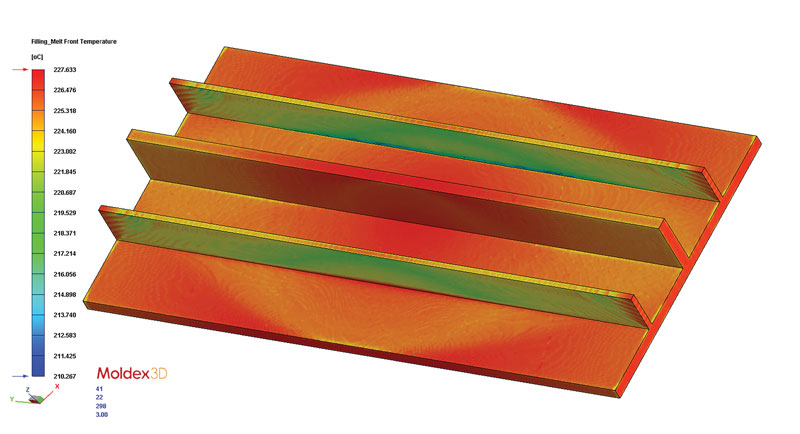
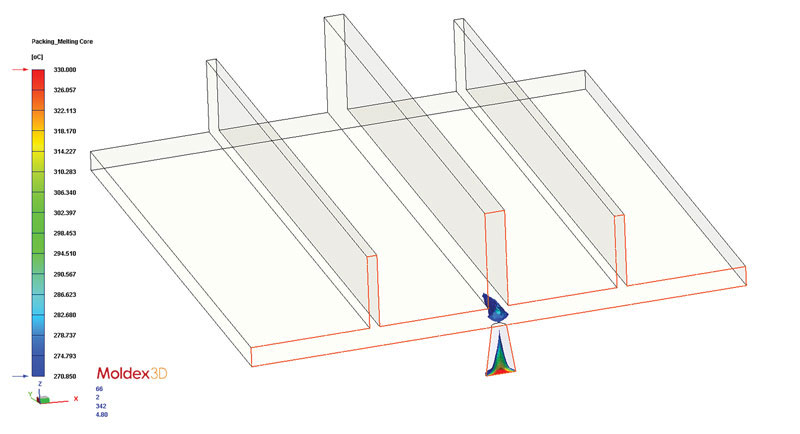
Molding simulations of the two materials in this sample part: These images indicate the melt front temperature, or the temperature of the part at the time the material flows over the location inside the mold. Clearly, these examples show the PPS molded part has a much wider temperature distribution. This clearly indicates that the polymer rapidly loses temperature to the mold, most noticeably in the thinner ribs. The PP material, while showing similar behavior, loses temperature more slowly.
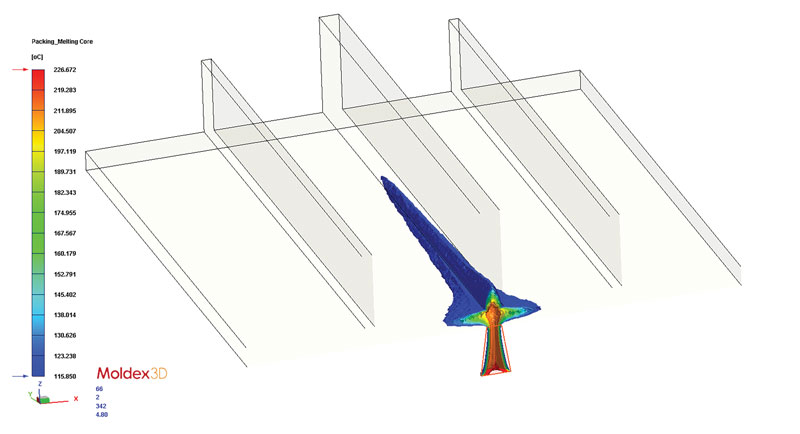
The PP no-flow, or transitional, temperature is reached at 11 seconds into the packing and cooling phase, while the PPS temperature is reached at 3.6 seconds. The areas shown in blue are above the no-fl ow or transitional temperature and still are molten. Notice that a shorter cycle time can be achieved with PPS than with PP, since each polymer material has its own thermal characteristics that affect the outcome.
Understanding polymer thermal properties is important for evaluating heating and cooling behaviors in molded parts. Specific heat capacity and thermal conductivity influence the transmission of heat during the heating and cooling phases. By understanding these behaviors, part and mold design decisions can be made that will influence the overall quality of a molded part, such as wall thickness in relation to fl ow distance capability or the location and number of gates.
Part designers, mold designers and moldmakers can evaluate thermal properties of a polymer material to optimize thermal mold temperature behavior and the mold cooling system. By understanding heat energy management inside a mold, molders can optimize a mold’s cooling design to optimize quality and the overall cycle time and to achieve competitive piece part costs.
Torsten Kruse, the founder and president of Kruse Analysis and Kruse Training, is a leading expert in the injection molding industry, providing innovative CAE simulation services, software applications and state-of-the-art online training for design and process engineers.
Now, Kruse has developed Kruse Training, a platform that delivers the knowledge and expertise obtained over two decades in the injection molding industry, with the goal of developing synergistic teams of cross-trained professionals who can successfully design and mold plastic components. For more information, email Torsten_kruse@krusetraining.com or visit www.krusetraining.com.